
This article will cover the process of creating installation media with three different installation media creation Softwares (Rufus, Make startup disk and BalenaEtcher), once you have finished this article it will enable you to boot from a USB stick with your the OS that you wish to install.
BTW: This article may not make much sense for Beginners so be advised,
What is Kubernetes (aka K8s)?
It was developed by google in 2014 and it is now open sourced and used by many large companies throughout the world, from Shopify to Spotify and Netflix to Azure.
Many companies offer the Kubernetes service, from Azure (AKS — Azure Kubernetes Service), Google (GKE — Google Kubernetes Engine), AWS (EKS — Elastic Kubernetes Service).
It’s official description is Container orchestration system, and the basic concept is “Distributing intense load to several machines to increase speed and reduce load to a single machine”.
For example, if you have a simple C# backend, deploying it normally would mean that it would be hosted on 1 machine, every single request would go to that one machine. with an intense amount of requests, the server won’t be able to take it hence it will become slow and may even crash or you would need a quantum computer for it to survive which is highly impractical.
But with Kubernetes, it will basically run the same C# backend on many different instances and distribute the load equally, with configurations you can auto scale it, IE: tell the engine to increase the amount of instances in proportion to the load.
The Architecture of K8s
As a prerequisite, it would greatly help to know about Docker and how Docker Images and how Docker Containers Work.
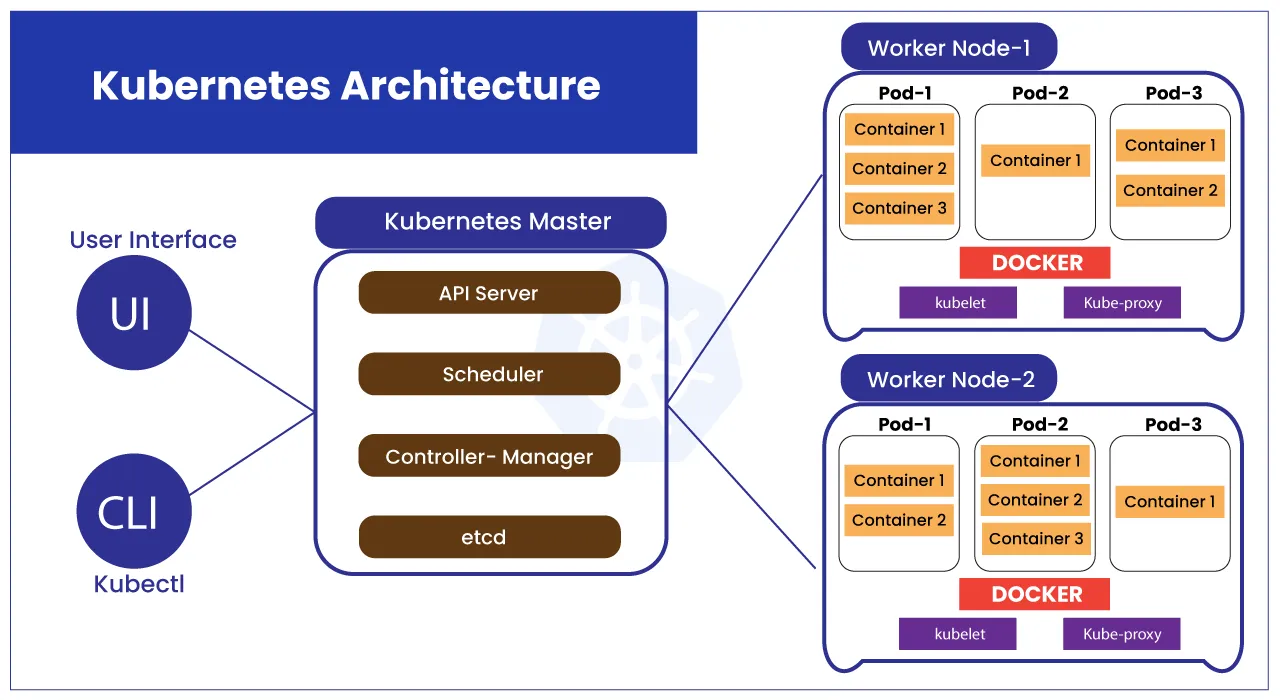
What is a Kubernetes Cluster?
This is practically everything in the image above. A cluster is a group of Nodes (aka worker machines), the Nodes Run containerized applications within each Pod.
The Cluster can be accessed VIA:
UI (eg: GKE dashboards), Or a CLI, most commonly kubectl, for Minikube (a local single node cluster), they use minikube kubectl --
What are Nodes?
As you can see in the image above, there are 3 nodes,
- K8s Master Node
- K8s Worker Node 1
- K8s Worker Node 2
A node is practically a virtual or physical machine (depending on the cluster)
there are two types of Nodes in a cluster:
- The Master Node, there is always only 1 of these in any cluster, it is reserved for the cluster so nothing runs on this, it is like the Control plane for the Cluster, to change item inside the cluster you need to go through the Api Server. In some special clusters, there might not be a Master Node, such as Minikube which is a single node cluster.
- The Worker Nodes, this is where all the pods will be located in, Each worker node is controlled by the control plane which is in the Master Node, they all have a unique internal Ip address, A cluster can have Several Worker Nodes. What is the Kubelet? In very simple terms, the kubelet registers the node with the api server and keeps checking with the PodSpec (A YAML or JSON object that describes a pod) to see if the Pod’s Containers are running healthy
What is the Kube-Proxy?
It’s a network Proxy that runs on each node in the cluster, it monitors the changes to Services and their endpoints and maintains network rules on the node to forward traffic correctly to the pods
What is a Pod?
Inside the WorkerNodes, you can see that there are quite a few pods,
inside each pod there is a group of containers that share storage, network resources and a specification on how to run the containers.
the pods are seen as disposable, so you would rarely create a single pod, if a pod fails, then it is shut down and another one is created in a blue green deployment fashion, Usually in a Pod, there is one Main container and the other’s are just support containers for the Main one. Most commonly there is just one container per pod
What is a Service?
A Service is a method for exposing a network application that is running as one or more Pods in your cluster. As we said above, Pods are disposable, so when a new pod comes with a new IP, it will be a nightmare for other Pods/Services to talk with it.
there are three different type you need to know.
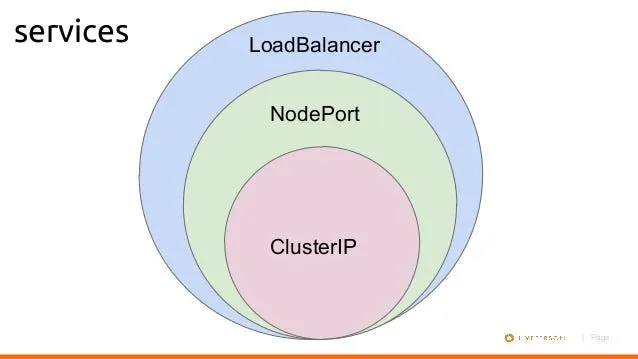
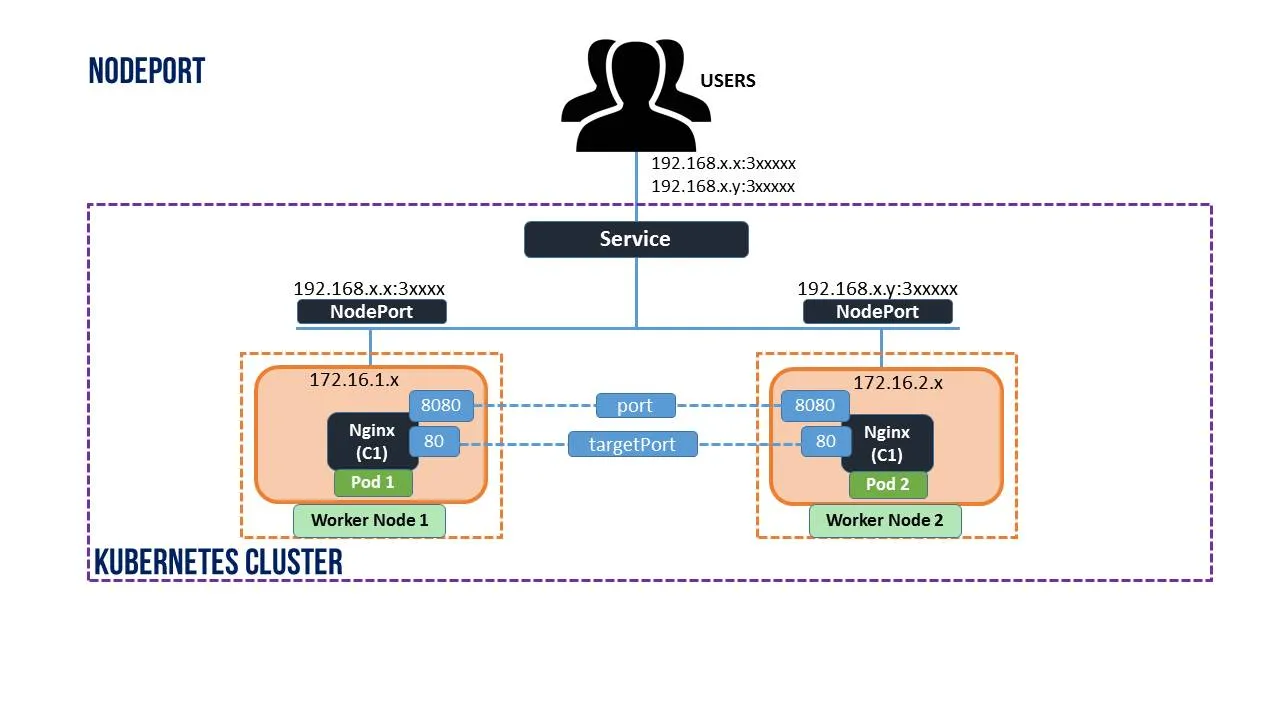
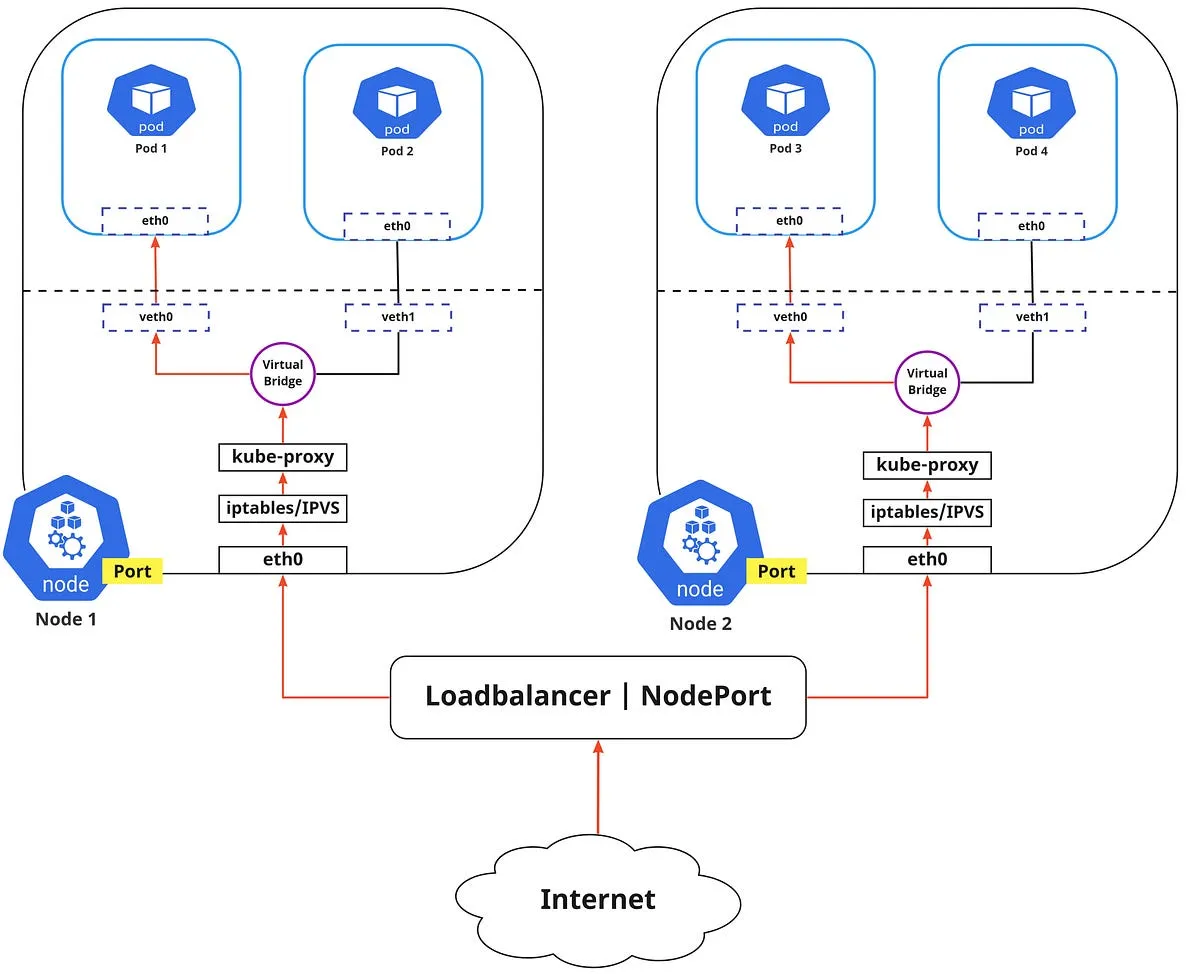
Service Type: NodePorts It listens to requests on a specific port within the node and forwards the request to the port of a Pod that is running the containers It is kind of like a Gateway into the worker Nodes.
These services are ideal for applications that need to be accessible from outside the cluster, such as web applications or APIs. With NodePort services, we can access our application using the node’s IP address and the port number assigned to the service. But it isn’t good for Heavy Load pods
This won’t make sense now, but to create a NODEPORT service VIA YAML scripts, we do this
apiVersion: v1
kind: Service
metadata:
  name: frontend
spec:
  selector:
    app: frontend
  type: NodePort
  ports:
    - name: http
      port: 80
      targetPort: 8080
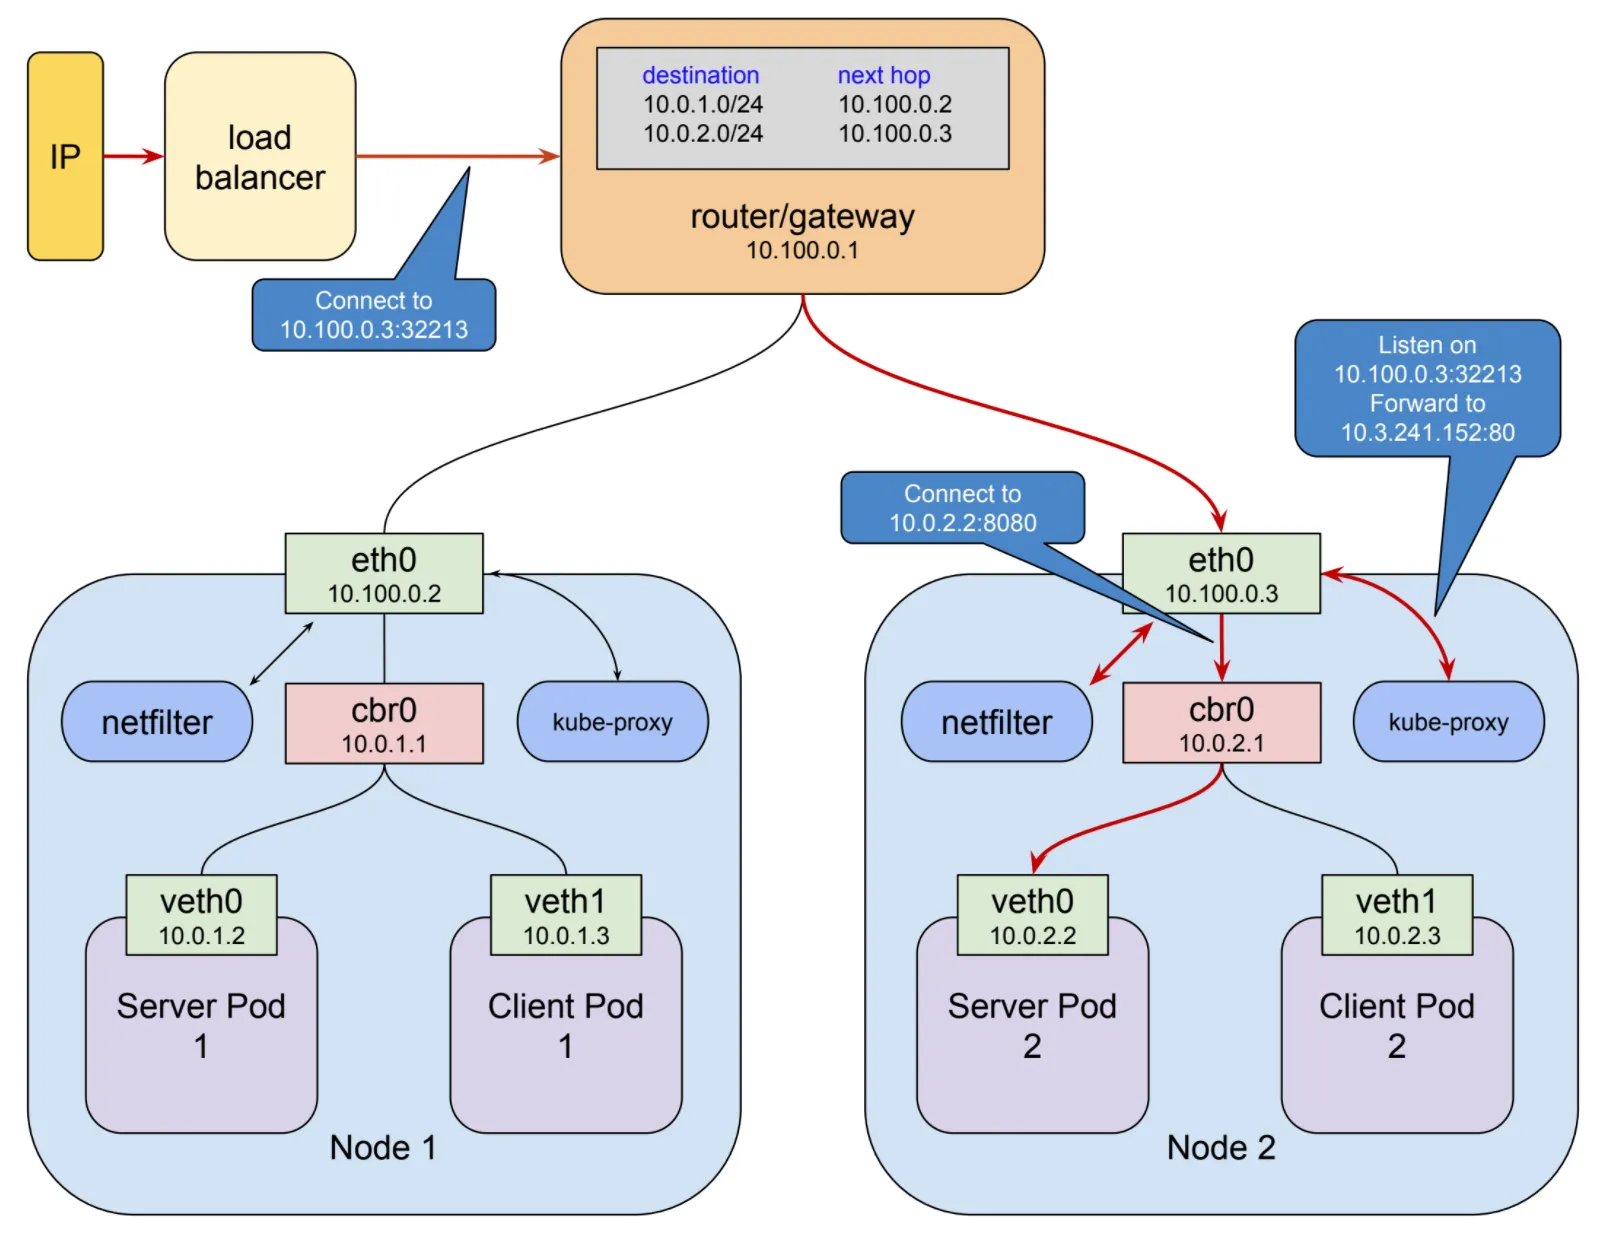
Service Type: ClusterIP This exposes a POD so that traffic can flow into if from other Pods, it is isolated from the outside world (anything outside the cluster can’t reach it) and it can only talk to other ClusterIPs, or any other Service inside the pod (INC other NodePorts or LBs),
Ignoring the weird names, Here the Cluster IP is most likely veth0 or veth1, traffic can’t flow from anywhere else other than cbr0 which is most likely another service
*cbr0 is own kubernetes bridge which is created to differentiate from docker0 bridge used by docker.
This is going more towards the advanced site but the Idea of a Cluster Ip is that it’s the small gateway that allows traffic ONLY from services inside the Cluster
This also won’t make sense now, but to create a clusterIP service VIA YAML scripts, we do this
apiVersion: v1
kind: Service
metadata:
 name: backend
spec:
 selector:
 app: backend
 ports:
 - name: http
 port: 80
 targetPort: 8080
Service Type: LoadBalancer
this is an alternative to the NodePort, except it is more powerful and intended for much heavier load, although it could get Really Costly
It exposes your node to the Outside world and directs traffic to the specified pods and also acts as a Load balancer by sending traffic equally to multiple replica pods.
Again this won’t make sense at the moment, here is how to create a Loadbalancer service VIA Yaml
apiVersion: v1
kind: Service
metadata:
  name: web
spec:
  selector:
    app: web
  type: LoadBalancer
  ports:
    - name: http
      port: 80
      targetPort: 8080
You can get a Service:LoadBalancer From different Cloud Providers too and this will be more expensive in the short run although it could be more efficient and cost effective.
What are Ingress Gateways and Istio Gateways?
These are 2 alternatives of each other, both of them control the flow of traffic
Both Ingress and Istio have two Types, Type ingress: Inward flow of traffic Type egress: Outward flow of traffic
Ingress and Istio both expose HTTP and HTTPS routes from outside the cluster to services within the cluster.
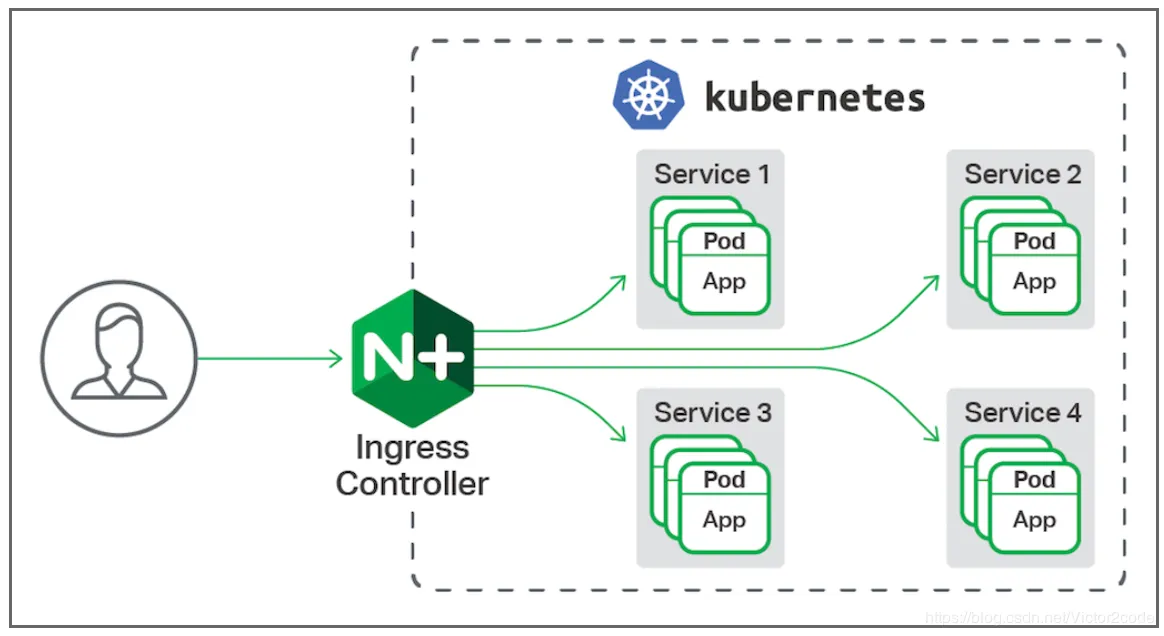
You can configure multiple routing rules in the Ingress/Istio resource to direct traffic to different services, here’s an example of some Ingress routing rules
apiVersion: networking.k8s.io/v1
kind: Ingress
metadata:
  name: my-ingress
spec:
  rules:
  - host: shop.com
    http:
      paths:
      - path: /buynow
        pathType: Prefix
        backend:
          service:
            name: buynow-service
            port:
              number: 3000
      - path: /listproducts
        pathType: Prefix
        backend:
          service:
            name: listproducts-service
            port:
              number: 6000
  - host: auth.shop.com
    http:
      paths:
      - pathType: Prefix
        path: "/login"
        backend:
          service:
            name: login-service
            port:
              number: 80
  - host: "*.shop.com" #wildcard
    http:
      paths:
      - pathType: Prefix
        path: "/"
        backend:
          service:
            name: notfound-service
            port:
              number: 8080
The ingress states that we have a site (not registered with DNS but just a simple IP), So any traffic to a registered route will direct traffic to the corresponding service which then in turn directs it to the pod, EG: shop.com/buynow → buynow-service shop.com/listproducts → listproducts-service auth.shop.com/login → login-service bob.shop.com → notfound-service
Here is an example of an Istio Gateway
apiVersion: networking.istio.io/v1beta1
kind: Gateway
metadata:
  name: my-gateway
  namespace: some-config-namespace
spec:
  selector:
    app: my-gateway-controller
  servers:
  - port:
      number: 80
      name: http
      protocol: HTTP
    hosts:
    - uk.bookinfo.com
    - eu.bookinfo.com
    tls:
      httpsRedirect: true # sends 301 redirect for http requests
  - port:
      number: 443
      name: https-443
      protocol: HTTPS
    hosts:
    - uk.bookinfo.com
    - eu.bookinfo.com
    tls:
      mode: SIMPLE # enables HTTPS on this port
      serverCertificate: /etc/certs/servercert.pem
      privateKey: /etc/certs/privatekey.pem
  - port:
      number: 9443
      name: https-9443
      protocol: HTTPS
    hosts:
    - "bookinfo-namespace/*.bookinfo.com"
    tls:
      mode: SIMPLE # enables HTTPS on this port
      credentialName: bookinfo-secret # fetches certs from Kubernetes secret
  - port:
      number: 9080
      name: http-wildcard
      protocol: HTTP
    hosts:
    - "*"
  - port:
      number: 2379 # to expose internal service via external port 2379
      name: mongo
      protocol: MONGO
    hosts:
    - "*"
what are these Yaml files?
When creating any K8s resource, it can either be done VIA the dashboard or like a YAML, we won’t go into depth of these yet but we might make more articles on Helm Charts which use Yaml files.
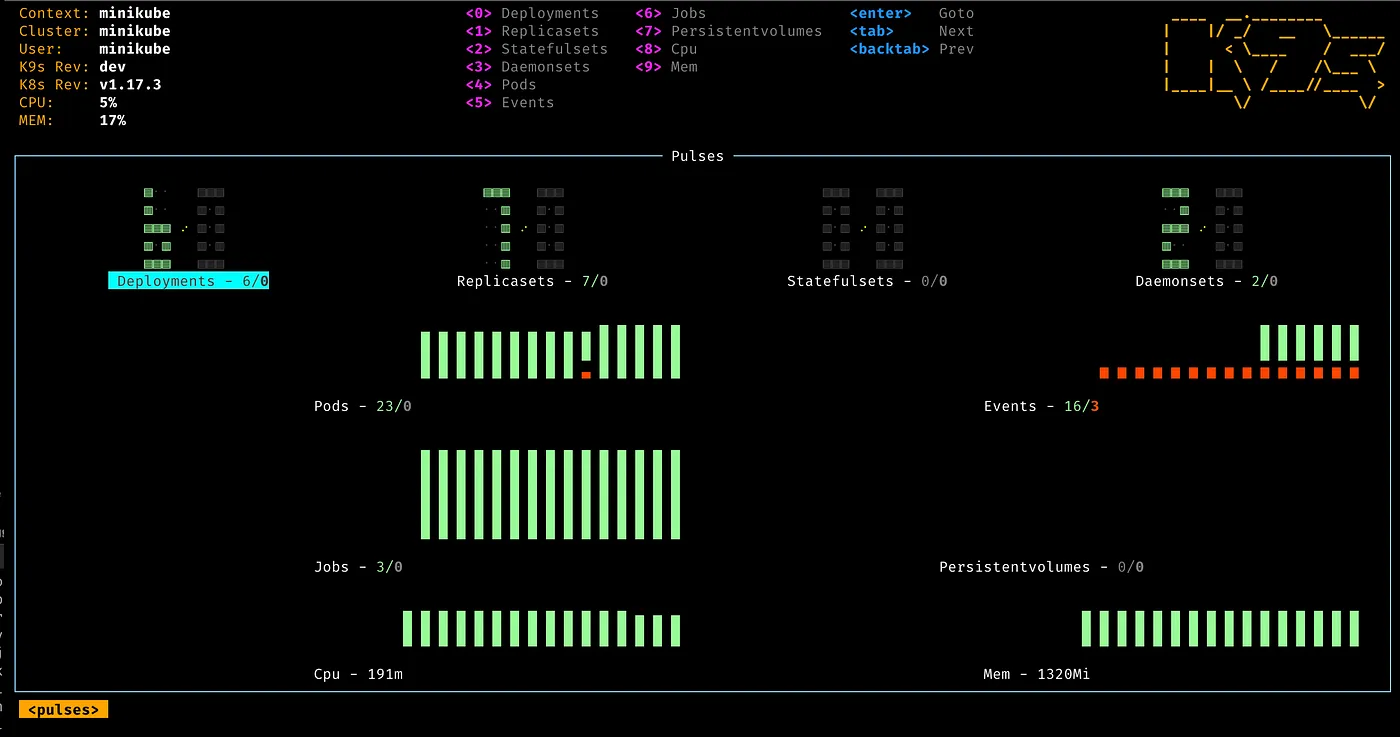
K9s
Don’t worry, this isn’t some super-charged variant of Kubernetes, It is just a dashboard that is very useful for insights on your cluster, It runs locally on your machine, and can be installed from the main site
The End
Thank you for reaching the end of this long article, this definitely is a lot to take in, K8s is one large new deployment architecture.
I am Gavin (Franzia), I studdied K8s on GCP back in the October/November of 2023.
I wrote this article for CoderZrepublic, A friendly discord Community where I teach Programming and DevOps alongside 2 Highly Skilled Devs (sanemishin & ghostyjija), feel free to join our Discord and Checkout our Website.
Once again Thank you and hope this article helped you on your project, अगली बार कॉमरेड तक (Until next time Comrade)